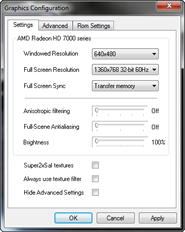
- Video Card [label]
- "Windowed Resolution" [menu]
- "Fullscreen Resolution" [menu]
- "Full Screen Sync" [menu]
- "Anisotropic filtering" [Slider]
- "Full Scene Antialiasing" [Slider]
- "Brightness" [Slider]
- "Super2xSaI textures" [checkbox]
- "Always use texture filter" [checkbox]
- "Hide Advanced Settings" [checkbox]
"Video Card" [label]
This is your graphics card name as known by Windows - in v1.6 the plugin is
autodetecting a number of features based on your hardware capabilities, although
the name is not used directly, this is simply here as a reminder for you when
you are configuring the plugin.
"Windowed Resolution" [menu]
The menu lists all standard resolution from 320x240 up to 1600x1200.
- default setting: 640x480
- generally recommended setting: 640x480, or your preference.
This control sets the resolution of the window, or to put it another way (since
your screen resolution is not changed) the size of the window.
Notes:
- plugin window resolution and position is independant of the Project64 ROM
Browser window resolution and position. This is by design, it may seem strange
to you at first.
- large windowed resolutions can reduce performance, it's usually better
to go fullscreen.
- see points at top about resolution choices.
About resolution selection:
- The N64 has a low native resolution compared to typical PC resolutions,
N64 games are designed in the range 320x240 - 640x480. This means that choosing
high resolutions can create a noticeable distinction between 3d parts and
2d (pre-rendered bitmap) parts of a scene, in games that mix the two (e.g.
Zelda). Arguably the best appearance is achieved by using a "low"
resolution such as 640x480 and a high level of FSAA.
- Although the plugin allows you to set any resolution, you should really
only use ones that are exact multiples of native n64 resolution (which you
can assume is 320x240), such as 640x480 and 1280x960. Using other resolutions,
particularly ones with non 4:3 aspect ratios (4:3 is the aspect ratio of a
conventional TV set), can lead to image distortion that is very noticeable
in some games. The decision is left up to you however.
Changes take effect immediately.
Wide-Screen Window Resolutions
848x480, 1024x576 and 1380x768 (depending on your desktop full screen
resolution) will make pj64 GUI act like a WS view for a delightful new gaming
concept and although still in its experimental stage! try playing Zelda OOT or
MM without loving it.
"Fullscreen Resolution" [menu]
What is available in this menu depends on what is detected on your system.
If a mode that you wish to use is not available, consult your graphics card
documentation, because it's a problem with your graphics card or drivers, they
either cannot do the mode or the drivers are reporting wrongly.
- default setting 640x480 16-bit 60 Hz (Refresh Rate)
- generally recommended setting: 640x480 32-bit, 1280x960 32-bit or your desktop
resolution (see below)
The plugin enumerates and lists all available modes on your system in this
menu, in the format: (Horizontal Resolution) x (Vertical Resolution) x (Colour
Bit Depth)
Notes:
- If 24 bit colour modes are listed, do not select them. Most graphics cards
cannot render 3D in 24 bit colour, or they are slower - choose a 32 bit colour
mode instead.
- Do not select a mode that you know your graphics card cannot render 3D in
(as a limitation of your graphics card) - for example any 32 bit colour mode
on a 3dfx Voodoo3.
- if you match the fullscreen resolution to your Windows desktop resolution
and colour depth, you will be able to switch the emulator quickly between
windowed and fullscreen mode without your monitor having to re-synchronise.
However, your desktop resolution may not be a good choice... I happen to use
1280x960x32 as my normal windows resolution :)
- see points at top about resolution choices.
Changes take effect next time you go fullscreen.
See points under "Windowed Resolution" above!
"Full Screen Sync" [menu]
What is available in this menu depends on what is detected on your system,
out of a maximum 5 possible settings. If you want to use a setting not available,
consult you graphics card documentation.
- Transfer Memory
- Double Buffer Vsync
- Triple Buffer Vsync
- default setting: Transfer Memory
- generally recommended setting: Triple Buffer
Transfer memory means use no extra buffering. This saves video card memory
and may be the best option on cards with limited memory. However, all modern
cards should be able to buffer without penalty, I suggest you try triple buffering.
The other choice is whether you want Vsync or not (see Glossary), I personally
prefer not to use Vsync. Note that use of Vsync also depends on your graphics
card driver settings, it may already be forced on or off there.
Changes take effect next time you go fullscreen. This control does not apply
to windowed modes.
"Anisotropic filtering" [Slider]
If the checkbox is greyed out, the plugin has detected that your system (hardware/drivers)
is not capable of any level of anisotropic filtering. If the slider remains
greyed when the checkbox is enabled, the plugin has detected that your system
is only capable of one level of anisotropic filtering (2x - this is true of
all GeForce1 and GeForce2 class systems). The range of anisotropic filtering
levels available depends on your hardware and drivers. Consult system documentation
if you need further assistance.
- default setting: Off
- generally recommended setting: enabled and as high as possible without losing
performance.
If enabled, the plugin instructs your graphics card drivers to use anisotopic
filtering. This can improve texture filtering quality dramatically, with a possible
performance cost. (A good place to see this difference is e.g. on the grass
in Zelda, looking in the mid to far distance).
If disabled, you will get standard bilinear texture filtering from your graphics
card.
"Full Scene Antialiasing" [Slider]
If this option is greyed out, the plugin has detected that your system (hardware/drivers)
is not capable of any level of anti-aliasing. Consult system documentation if
you need assistance.
- default setting: Off
- generally recommended setting: enabled
Usually referred to as "FSAA" (Full Scene Anti-Aliasing), this option
simply instructs your video card drivers to enable anti-aliasing. The results
(performance and quality effects) depend on your ardware capabilities, drivers
and configuration. Consult your system documentation for further information.
Notes:
- nVidia's drivers appear not to suppport this function in DX6. If you have
nVidia hardware you will probably need to force anti-aliasing using via your
driver controls or a driver tweak utility.
- This control will work both windowed and fullscreen, provided your graphics
card is capable of both.
- Some graphics cards may require a particular Buffer Display Mode selected
for FSAA to work when in fullscreen (e.g. the Voodoo5 probably won't give
you FSAA if set to Transfer Memory).
Setting may require restart of ROM or App for changes to take effect
"Brightness" [Slider]
- default setting: Off (100% game default)
- generally recommended setting: user preference (ideal for dark games likes
Doom64, Quake II etc) GF2 cards or lower are not supported on this function.
"Super2xSaI textures" [checkbox]
- default setting: disabled
- generally recommended setting: disabled \ user preference
doubles the size of textures using a special enhancement filter so you can
get the best overall experience with it. there may be a small performance hit
when you use this enhancement but the effect in most cases would be worth it.
"Always use texture filter" [checkbox]
- default setting: disabled
- generally recommended setting: disabled, for most games
Forces rendered primitives to be alpha tested for transparency, then blended
with the frame buffer. Generally, this causes more problems than it fixes, even
within one game, but it can sometimes help, particularly with sprite edges.
See browser notes for occasional advice as to when this is required (rare).
"Hide Advanced Settings" [checkbox]
- default setting: enabled
- generally recommended setting: disabled once you have read all this documentation!
When enabled both the Advanced and ROM Settings tabs of the video plugin configuration
dialog are hidden from the user. This is to make Project64 easier and "safer"
for beginners to use. You will probably find you need to disable this at some
point to get access to the full range of controls, however note that casual
fiddling with the options will cause problems, so don't touch anything you don't
understand, and remember what you changed!