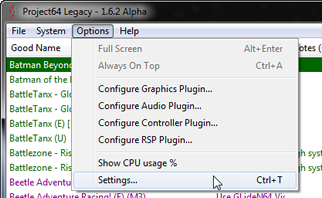
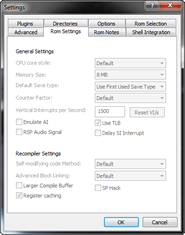
Options > Settings > ROM Settings
This
page covers configuration of the core for each individual ROM. Some of these
settings are also available under the General tab, and although the settings
have the same meaning there, they have a slightly different purpose.
General Settings:
- "CPU core style"
- "Memory size"
- "Default save type"
- "Counter Factor"
- "Vertical Interrupts per Second"
- "Emulate AI"
- "Use TLB"
- "RSP Audo Signal"
- "Delay SI interrupt"
Recopiler Settings:
- "Self
-mod. code method"
-
"Advanced Block Linking"
-
"Larger Compiler Buffer"
- "SP
Hack"
-
"Register Caching"
Points
- It is highly recommended that you do not make any changes here unless
you understand exactly what you are doing. Understanding what you are
doing takes experience that cannot be obtained from this manual alone. You
are likely to reduce performance and/or stability.
- The emulator is (hopefully!) supplied with the optimal configuration
for (almost) every game!
- When you make changes here, you are actually editing the Project64 ROM
Database (the file Project64.rds). You can also edit this file directly
in a text editor - advanced users only! If you get in a mess, the only way
to go back to the supplied settings is to replace Project64.rds (from the
original downloaded archive). There is no "reset to defaults" button
or similar.
General Settings:
"CPU core style"
Possible settings:
- * use general setting
- Interpreter
- Recompiler
- Synchronise Cores (debug builds only)
- default setting: * use general setting (by default: Recompiler)
- generally recommended setting: Recompiler if it works
The Recompiler and Interpreter are two seperate cores in the emulator (although
the Recompiler implementation is based on the Interpreter). Generally, any game
that works on the Recompiler will also work on the Interpreter, but not always
vice-versa. Explaining the difference between a Recompiler and an Interpreter
in a general sense is beyond the scope of this document, suffficient to say
that the Recompiler is (usually much) faster but (a little) less compatible,
the Interpreter (usually much) slower but (a little) more compatible. If you
have a fast enough PC that peformance is not an issue for you, you can probably
use the Interpreter all the time, but i wouldn't recommend it since it generally
shouldn't offer much advantage.
Note that if you are using the Interpreter, the following settings are
ignored (they are only relevant to the recompiler):
"Memory size"
Possible settings:
- * use general setting
- 4MB
- 8MB
- default setting: * use general setting (default: 8MB)
- generally recommended setting: 4MB, unless needed.
An emulated RDRAM size of 4MB is the standard amount of memory an N64 console
has.
An emulated RDRAM size of 8MB represents an N64 console with the 4MB memory
expansion accessory installed, plus the original 4MB. This results in larger
state saves and can lower performance. Most games do not benefit at all from
the Expansion Pak. Some games require the Expansion Pak (e.g. Zelda2), some
games give you more with it (e.g. Perfect Dark), some games just use it to raise
resolution (in which case we recommend you don't use the Expansion Pak since
graphics are HLE anyway, see below).
Notes:
- if a game supports the Expansion Pak as an option it will usually tell you
in its introduction screens (usually two lines, like "Expansion Pak supported,
Expansion Pak detected"). If a game doesn't support the Pak, or absolutely
requires it, it probably won't say anything.
- you gain nothing by using the Expansion Pak on a game that doesn't support
it - you just waste resources.
- further, if a game has optional Expansion Pak support where the Pak is used
only to raise screen resolution, it is generally recommended you set this
to No, because there's no point wasting resources on higher native resolutions
when the graphics are high level emulated (hence largely resolution independant)
anyway, also it can often cause severe aspect ratio problems in the video
plugin.
- in rare cases, for reasons unkown to me, the Project64 video plugin requires
the Expansion Pak to avoid an Access Violation (even in games that don't use
the Expansion Pak). The RDS is already set up for this for all known cases.
- the above two points explain why the setting may sometimes appear to be
logically incorrect - it has been set that way for a good reason!
- this setting should already be correctly configured for every game by the
RDS, don't change it unless you know what you're doing!
"Default save type"
Possible settings:
- * detect first used type
- 4kbit EEPROM
- 16kbit EEPROM
- 32kbyte SRAM
- 128kbyte FlashRAM
- default setting: * detect first used type
- generally recommended setting: * detect first used type, unless game uses
16kbit EEPROM or a copy protection system that tries to trick the emulator
into using the wrong save type.
You can set any of the four possible native cartridge save types here, but
the only one that should be needed is 16kbit EEPROM, because it is not possible
for the emulator to detect the difference between a game asking for 16kbit and
a game asking for 4kbit - Project64 assumes 4kbit, the more common size. If
a game actually needs 16kbit it will either fail to save or not boot unless
set to 16kbit EEPROM. The other settings are included for the rare possibility
that the autodetect goes wrong - generally, don't set them. Note that MemPak
is treated seperately and will work in addition to whatever is selected
here.
"Counter Factor"
Possible settings:
- * use default (2)
- 1
- 2
- 3
- 4
- 5
- 6
- default setting: * use default (2)
- generally recommended setting: 1 or 2 (possibly 3, see below)
Counter Factor effects the timing in the core, it's a difficult option to explain,
what you need to know is that 2 is the default and best speed you can get in
most games without causing problems like missing video frames, 1 is required
by some games to prevent flicker or optionally to increase smoothness, and 3
is a possibility for some games to improve performance. Values higher than 3
are likely to cause severe frame loss, leading to instability. But in the hands
of experienced users this setting can be used as a crude form of frame-skip.
Experienced users only!
Vertical Interrupts per
Second
- default setting: 1500
- generally recommended setting: unchecked if not needed, checked if needed.
VI/s
(Vertical Interrupts per
Second) is the emulated rate
of speed, in vertical
interrupts per second.
A
'vertical interrupt' Is the
row-by-row refresh of pixels
drawn on the emulated
screen.
The default VI/s
setting is 1500, and is
recommended to be left
alone.
Project64 was originally
designed for the end user to
not be tweaking this
setting, so as a result, it
was set with at a secure
default. But with current
development as it is, we
have decided to allow the
end user the right to have
access to the setting.
- default setting: unchecked
- generally recommended setting: unchecked unless
needed
This option was added in v1.6.1 to help a small number
of games that had issues with no sound or speech issues such as: (example Hydro
Thunder, Disney's Tarzan, Top Gear Rally, Res Evil2, TWINE)
"Use TLB"
Possible settings: checked or unchecked
- default setting: checked
- generally recommended setting: unchecked if not needed, checked if needed.
This is another highly technical core feature, it's part of the N64 CPU, used
extensively by some games (Goldeneye, Mario etc) and not at all by others (Zelda,
Banjo etc). If a game uses the TLB (end user can't tell this without knowing
or by trial and error) then this must be enabled or the game will fail with
various error messages, usually soon after boot. TLB is an option mainly because
you can gain some performance by turning it off where not needed.
"RSP Audo Signal"
Possible settings: checked or unchecked
- default setting: unchecked
- generally recommended setting: unchecked for most, but enabled for certain
specific games.
This option has allowed for some once unsupported Musyx games like: Hydro
Thunder, NBA Showtime, Disney’s Tarzan to be playable with either loading
with sound available or now accessing speech although not perfect in games such
as The World is Not Enough and Resident Evil 2.
"Delay SI interrupt"
Possible settings: checked or unchecked
- default setting: unchecked
- generally recommended setting: unchecked unless needed
This option was added in v1.5 to help a small number of games that were broken
in v1.4. It's simply either needed (for example Cruis'N USA) or it isn't. Usually
it isn't.
Recopiler Settings:
"Self -mod. code method"
Possible settings:
- * use general setting
- None
- Cache
- Check Memory & Cache
- Check Memory Advance
- Change Memory & Cache
- Protect Memory
- default setting: * use general setting (by default: Check Memory Advance)
- generally recommended settings: highly game dependant! (see below)
Many games use "self modifying code". In a nutshell, this makes them
harder to keep running during play. Project64 has several methods of dealing
with these situations, which range from fast at one end to more secure (stable)
at the other. In order from fastest to most secure these are:
None > Cache > Check Memory and Cache > Check Memory Advance >
Change Memory and Cache > Protect Memory
If a game does not use self modifying code (e.g. Mario64) this can be set to
None (but read notes below). A typical self modifying code game such as Zelda
(and many others) are optimal on "check memory and cache" or "change
memory and cache" or "check memory advance" (depends on game).
Some games will only run stable on "protect memory", which is a very
secure method. Some trial and error is needed for you to find out which setting
is best - you are looking for the fastest method that doesn't crash.
Notes:
- Which is most secure out of Check Memory Advance and Change Memory &
Cache depends very much on the particular game, sometimes one is more secure,
sometimes the other.
- In general, Check Memory (either variant) and Change Memory & Cache
are the most useful self. mod code methods, offering a good balance of performance
and stability.
- Unfortunately sometimes a game will be fine on one method (e.g. Check Memory
& Cache) except for one single point where it fails, and Protect Memory
is needed. If you find this is the case, and Protect Memory is significantly
slower, try changing back to Check Memory and Cache after you have passed
the point.
- For reasons unknown to me, if you aren't using Advanced Block Linking, some
games that don't use self mod. code need a self mod code method set. Cache
is sufficient. This should already be set by RDS, this is just a warning.
- Protect Memory can cause severe slowdown, either all the time a game is
running, or during particular periods, and in rare cases a game will not work
at all with it. Only use Protect Memory when necessary.
"Advanced Block Linking"
Possible settings:
- * use general setting
- Off
- On
- default setting: * use general setting (default: On)
- generally recommended setting: highly game dependant! (see below)
Advanced Block Linking is one of Project64's speed optimisation techniques
- it usually provides a speed vs. smoothness tradeoff that you'd want to set
globally (for all games) under the
General tab,
according to whether you have a fast or slow PC. On is usually (often significantly)
faster than Off but may be less smooth. This depends on the game. Afew
games run particularly badly with this On, or may require this to be
On or Off, which is why the RDS sometimes does set this control.
"Larger Compiler Buffer"
Possible settings: checked or unchecked
- default setting unchecked
- generally recommended setting: unchecked unless it helps
Some games generate particularly complex code structures
which tend to overlow the default 20MB compiler buffer and temporarily stall the
system, causing a pause in gameplay. By enabling this a game will be given a
50MB buffer, which obviously increases resource usage but may help reduce
occurence of overflows and thus improve performance. Most games do not need more
than 20MB hence this will usually only waste resources
"SP hack"
Possible settings: checked or unchecked
- default setting: unchecked
- generally recommended setting: checked unless it causes failure
This option was added in v1.5 simply as a performance feature - enabling it
gives typically 5% more speed from the core, however a large numbe of games
will not be stable with it enabled, therefore it's not set often. Try it if
you are desperate for speed, but for most people most of the time it's recommended
you leave it off.
"Register Caching"
Possible settings: checked or unchecked
- default setting: checked
- generally recommended setting: checked, unless it causes a failure.
Probably the recompiler's most significant optimisation technique, register
caching usually dramatically improves the efficiency of the recompiler, and
usually without side effects. The reason this is included as an option is that
sometimes register caching will produce an error in a game. Register caching
can cause many kinds of obscure errors, such as events in a game not triggering,
or a game becoming stuck in a loop, or graphics being messed up, aswell as obvious
errors such as a crash. If you find you are having stability problems with the
recompiler and not the interpreter, try disabling register caching to see if
you can get past the point/game with at least some of the performance of the
recompiler.